Showing posts with label No Function Friday. Show all posts

Friday, October 29, 2010

Fridge Art!

Sorry, I'm late again to 'No Function Friday'!  It's been crazy busy around here lately trying to get ready for this Holiday Bazaar coming up! 

But better late than never I suppose! :)

Speaking of the Holiday Bazaar....this Friday's craft is another item I'm planning to sell at the show!

And believe it or not....it actually DOES have FUNCTION!!

I would prefer to add a bit more embellishment, but for the most part and I am quite pleased with the final product!

Sorry I don't have more pictures, I was in a huge hurry!  I'll be making plenty more and I'll show all the neat and colorful options I'll have available.  I've got LOTS of great choices lined up and I can't wait to show you all of them....when I get them completed! LOL

I'm actually considering selling these on Etsy.

Anywho...it has magnets on the back so your child can choose ONE piece of artwork to display on the fridge....making them happy and MOM happy too! :)

I have to admit...I am one of 'those' moms.  I love my kids artwork.  I just don't want it all over the house. 

This is something that is pretty for mom, functional for your kid, and limits 'masterpieces' to ONE at a time!  Plus it gives your child the freedom to choose which one gets displayed!

It kind of sassies up Fridge Art!!! :)

So...what do you think??  Any changes you think I should make? 

How much should I sell it for at the Bazaar next month??  I was thinking around $12. 

Thank you again for your ideas and opinions!! 

I hope everyone has a Happy Halloween!!! :)

Until next time....

Friday, October 15, 2010

No Function Friday - Porch Halloweeny-fied!

Yep, I make up words all the time! :)  "Halloweeny-fied" has a mighty fine ring to it if I don't say so myself!

So, as promised (although a little late today), I finally got pictures of my front porch all Halloweeny-fied! 


My $2 candleabra from the Christmas Tree Shoppe!  I LOVE that place! :)


WAIT!  Before I show you anymore pictures, you know I always feel the need to point out my shortcoming and beg for designer forgiveness! 

Yes, my pillows are still all summery looking!  I actually have outdoor fall looking fabric I got on clearance at Joanne's a couple months ago recently that I haven't gotten around to making slipcovers out of of!  

And yes, I do have a bright green extension cord for my lights!  I had good intentions to replace it with an appropriate one...but you know time gets away from you and before you know it's two weeks before Halloween and your all like...f-it.  Yeah, that's pretty much where I am with the green extension cord now.

Oh...and mums!  Yep, I actually do plan to buy a mum for my red planter I moved by the door.  But it could easily slip into the green extension cord category. ;)

Ok, phew....I fell better!!  Moving on: 


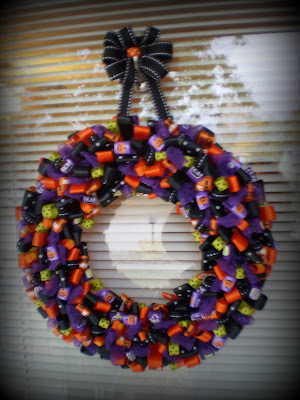
My Halloween Ribbon Wreath from this post, I forgot needed something to HANG from, duh, so I added this bow and some ribbon to hang it from.


Here's some of the goodies spread throughout my flower bed:


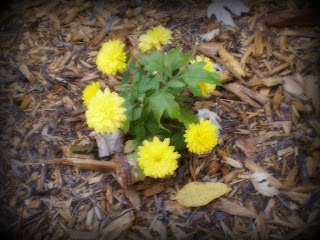
My little mum that was transplanted last year.  We weren't sure if it was truly a mum, but saved it anyway just in case...last year it sprouted one flower.  This year, she's growing up. ;)


And a Praying Mantis even stopped by to add to the outdoor fun!!


Ok, so there you have it!  My Halloweeny-fied front porch and flower bed! :)  Most of the stuff in the pictures I've had for years.  I just add one or two items to it ever year.  


One last thing...Melissa at Bursts of Creativity is having a Halloween tag giveaway!!  She did 5 tags everyday this week and they are FABULOUS!  Stop by and check them out and tell her which one you'l like to win! :)

I hope you all have a wonderful weekend!! :)


Until next time...

Friday, September 24, 2010

No Function Friday - Inspirational Picture and Magnet

It's been an exciting week around here at Where Beauty Meets Function! 

And I am so thankful to Melissa for being our first ever Guest Blogger!  And for allowing me to be a guest on her blog!  It was so much fun for Melissa and I to be able to switch places for a day!! :)

And thanks to Joanie for allowing me to post her super cool pumpkins!!  She doesn't know it yet...but she has some other projects I would like to post as well. ;)

Now onto today's craft for 'No Function Friday'! :)

This project is special to me.  First of all, it represents my exploring of a new craft...stamping!  I'm starting slow here, with just a black inked stamp. LOL  So, let's not get too excited just yet. :)  

And let me tell you...that black inked stamp took MULTIPLE tries!  I won't tell you how many...but it was quite a few to get an even look.

Here is one I did to put in a picture frame for my desk at work:


 I just used scrapbook paper and punches I already had to make the little scallops and rounded edges, plus I aged it with my favorite product...Jim Holtz Distressing Ink!  I glued the scrapbook paper to the little 'perfect-family-that-doesn't-come-close-to-representing-yours' insert that comes in picture frames (this is an old Wal-Mart frame I already had by the way).  I glued it right onto the face side, so the back is nice a plain.  And to top it off nicely I added little sticker jewels to give it some bling! :)  There the kind that change color depending on what direction you look at them from.

And I made this one.  I'm going to put magnets on it for my fridge.

 
For this one, I used a little piece of wood I had from Michaels.  I painted the back and edges white, then I Modge Podged the cut paper to the wood (after distressing it of course).  I had the nail head trim left over from another project, so I cut the nail part down some, put craft glue in the back 'hole' and then banged it into the wood slightly with my hammer and let the glue dry it the rest of the way into place.  It was real technical. LOL

It is my favorite saying in the whole world and one I try to live my life by as much as possible because I do believe each of us can influence change in others based on our own actions! 

"You must be the change you wish to see in the world"
- Mahatma Gandhi

I hope you each have a great weekend!!

Until next time...

Friday, September 17, 2010

No Function Friday – Upcycled Mail Sorter

This week’s project actually does have function, but since it’s a crafty, redo, updo, kind of thing, I’m still going to post it today. :)

I purchased this sorter at Goodwill about a month ago for $3,99. I thought that was a little steep, but I usually think Goodwill asks a slight premium on their stuff.


I loved the curvy lines…it just made it a little more unique!


I spray painted the whole thing white, just cheapest Wal-Mart white. I wasn’t going to age this one…but after it was done I realized it needed it. So, of course I ran some Ralph Lauren glaze over the whole thing, wiped it off and used Jim Holtz Distressing Ink around the edges of the paper. I added cute scrapbook paper and Modge Podged it to the fronts and glued ribbon to each one to cover the seam between the papers…and that’s it.  Oh, and I always use a sanding block to sand around the edges to knock down any unsmooth edges left on the paper.

Super simple and a fairly inexpensive upcycle (less than $10)!

Side by side before and after:


Until next time...


Friday, September 03, 2010

Fall Flowers Topiary

Today's "No Function Friday" project is a super simple and cheap one!

I used the flowers I had leftover from the my Leopard Pumpkins project, a foam ball and foam floral thingy from the Dollar Tree, 4 shish-kabob skewers, jute, glue, a plant holder I had laying around, and tissue paper (also leftover from the pumpkins project).

I took the 4 skewers and shoved them, pointy side, into the foam ball. Then I dipped the flowers into some craft glue and stuck them randomly into the ball.


I put glue on one side of the skewers and wrapped jute, which I already had, all the way around. Then I got some of the floral foam stuff and put it into a little metal bucket I had out in the garage.

I wrapped the bucket with tissue paper that was leftover from the pumpkins project and tied a little piece of ribbon (also from the Dollar Tree) around the base…and voila!

Fall Flower Topiary:

I can’t wait for fall!!!! 

Seriously, I want to put on my jeans and a warm cozy sweater!  I want to wear socks and shoes again...not just sandals!  I want to cook chili and bake stuff with pumpkin in it!

We are supposed to have some more fall like temperatures here in Indy this weekend!! And I can’t wait! 

I will be in the yard this weekend since it will finally be cool enough for me to enjoy again! There are beds to be finished this year before it gets too cold. (I don’t know if I’ve mentioned it yet…but I love to garden as well!) I’ve been slowly transforming my yard since I purchased my home. It was extremely unhealthy, no flower beds or any real beauty to speak of. So, it’s been a slowww process, but a labor of love.

I hope everyone has a wonderful Labor Day weekend!!! And don’t forget to check back Monday evening to see which logo won and who won the frames!

I've added daily party links on my sidebar for all the parties I will link my projects to!  As beautiful as everyone's little linky buttons are, this will really save me A LOT of time every week by doing it this way!
Until next time…

Friday, August 27, 2010

No Function Friday – Fabric Wreath

Ok, so I’m not one to normally toot my own horn…but I am SUPER excited about this week’s craft! It turned out GORGEOUS!

I’d love to lay claim to this piece of beauty, but I originally saw this idea over at High Heels and a Hammer and fell IN LOVE! Kristen’s wreath is beautiful! And I knew instantly I had to make my own!


So, I sat on the idea for a couple weeks. Then I found the perfect fabric!!

I bought a pre-assembled pack of fabric at Joann’s Craft Store on clearance that was perfect for my personality and red front door!


I paid more for this than I usually would for a project, but, I couldn’t have assembled a better array of fabrics myself!  So, I paid $14.97 for the fabric pack. It was regularly $29.99!! That’s just craziness in my opinion!


And I paid $3 for the ring at Michael’s.


And then is the easy part!

I cut and ripped each panel of fabric 1 inch wide and 9 inches long.

I’m not going to give a tutorial because Kristen did that already and I followed her steps pretty much as she wrote it.

My pile of fabric went from this:


To this:
 

I did not have enough fabric for the outer/biggest ring. But honestly, you’d never know if I didn’t tell you.  It’s still super full and you can’t see the extra ring over all the fabric. It would just be that much bigger if you finished off the outer ring too.

And it was that simple!

Time consuming? Yes. I think it took me about four hours to complete, from cutting, ripping to tying. But I sat in front of the TV watching movies with the Doodle, so it was a complete no brainer task.

And I did get blisters on my fingers from the fabric rubbing wear spots when I tied it.  But SO worth it!

Pictures absolutely do NOT do this wreath justice! It is just stunning in person!


And I’ll pass on a little idea my best friend had when she saw my wreath…this would be beautiful in Halloween or Christmas fabric!! Or think 4th of July…red, white, blue and star hanging in the middle! There are lots of cute wreaths you could make!

This one cost more than my usual craft projects, but it’s still less than $20 and well worth the price tag for the statement it makes to my front door! And I’m positive it can be made cheaper with different fabric choices than I made.

Fabric - $15
Ring -   $ 3
Total = $18


Oh, and FYI...make sure you check in next week!  I will be having a vote for my new logo!!!  And a GIVEAWAY!!

AND...check in this weekend.  I'm finishing up a FALL project that I am going to TRY to post tomorrow!  I want to submit it to Thrifty Decor Chick's Fall Inspiration Party! 

And of course, I will be posting this project to my favorite parties!!

Chic on a Shoestring Decorating

Get your craft on Thurs.


Making

The Girl Creative


Beyond The Picket Fence


Simpsonized Crafts

And some new ones!


Until next time...