Showing posts with label Dollar Tree. Show all posts

Friday, August 05, 2011

It's a Sign

I made my very first sign!!


I see so many signs in blogland and I have been dying to try my hand at making some for a long time.

I found these signs at the Dollar Tree.


I primed it with spray paint first to cover the stuff that was on it.

Then, I used several different kinds of craft paint to make the lovely gray color it turned out with.  Painting it gray, the watering down some white and wiping it over the wood.  Then, some watered down light gray and mixed that with some black....basically I just layered on colors.

Now, onto the stencil....


I've been talking to Mel from Junkin' Junky (if you don't follow Mel, go check her out, she is super mega talented and not to mention a sweetheart too)  about sign making and how she goes about making hers.  We talked about how she uses her Cricut to sometimes use vinyl to make the words and sometimes she uses vinyl to make a stencil.

We both agree that vinyl is so stinkin' expensive!  So, I was looking for any alternative before resigning to using vinyl.  I asked her about freezer paper, she said I could use that or I could use shelf liner. 

I tried using freezer paper first because it's what I had on hand.  It cut on the Cricut just fine.  But it is so flimsy I didn't feel like it made a good stencil.

I forgot to pick up shelf liner at the store and being desperate to make a sign...I tried using some glossy photo paper I had on hand.  It worked like a DREAM!!!!

Now I can't wait to make more signs!!  Seriously, it might be my new craft addiction. :)

I took this one to the booth/boutique/wall. ;)


I also took some plaques to the booth today.


I really do think my "No Soliciting" sign is working!  I haven't had a solicitor in a long time.  :)


Monday, June 27, 2011

Wall Art - Knock Off and NEWS

Many months ago I saw this original artwork from the amazingly talented folks at Restoration Furniture and I HAD to have it!!  


Seriously, I could not get this piece out of my head!  


Months of this swirling around in my head!!  Months of a picture of these tiles sitting on my desk.

Originally I had planned to use these in my bathroom.  But not long ago, I made a HUGE decision.  One I have wanted to do for years, but put on hold for many reasons.  But with my unemployment, I decided to start fulfilling the dreams I have for my life, one by one, and to stop just talking or thinking about it.  


-  As those that follow me know, college is just around the corner!  Classes for my Interior Design degree begin August 22nd to be exact!! :)


-  Several months ago I started volunteering at a local Women and Children's Shelter.  I work with the children once a week for 2 hours.  Plus Doodle and I serve dinner once a month.  It is the highlight of my week!! :)


-  And the HUGE decision I recently made (but have always wanted to do).....I am currently in the process of becoming a Licensed Foster Parent!!!  :)


So.....I have been working on turning my guest room, turned office, turned disastrous craft room...into a child's room!!  Specifically, a girls room between the age of 8-13...as this will be the age range I am requesting (because I feel she would blend into our life easier).  


I am becoming licensed as a "Special Needs Foster Parent", not an emergency foster home, as most people think of.  Special needs can mean alot of things, such as, behind in school, slow development, emotional needs, sexual abuse, etc.  Typically, the child will be in my home for 12-18 months while they try to prepare the family for reunification by completing the court ordered milestones...while I work with the child's needs.  If reunification does not remain an option, I could potentially adopt the child or at least provide a home until they can find an adoptive family. 


SOOOOO.....back to my knock-off artwork.  


It was obvious THIS art needed to be my inspiration piece for the new bedroom!! :)


I purchased these tiles at the Dollar Tree, with the little hangers on the back.  


After the fact, I realized you could just hot glue little hangers onto the back like they did, and save a little money by buying cheap tiles from a restore or the hardware store.


And for whatever reason, I didn't take any during photos.  I know you guys are not surprised. LOL


But basically, I just cut a variety of scrapbook papers and aged them and Modge Podged them onto the tiles.  


I used my Cricut to cut out the numbers...using my Sure Cuts Alot 2 Software so that I could choose multiple font types.


And here is how my version ended up!!


When I hung the tiles on the wall, they felt very wimpy.  I wasn't happy.  So, I started thinking of ways to beef up the artwork.  And as luck would have it, I found this picture at the Salvation Army for $2 and it was the perfect size!!!  That never happens! :)


I used spray paint for the frame and the matte.  I used the wall color paint for the center square...which I glazed and antiqued up a bit.  And I used black craft paint to paint the inner molding to help it stand out a bit.


I am completely IN LOVE with how this turned out!!!


It's fun.  It's whimsical.  It's non-committal to any certain "theme". 


Besides painting the walls, the yellow color that used to be in my living room...I've purchased a dark (almost black) denim comforter (from Kmart's Country Living line).  I figured that was neutral enough to make any tweaks once we know the child's personality. And now, added artwork.  


I made the throw pillow out of a $2  double-sided place mat and stuffed it using stuffing from an old pillow...so it literally cost me $2!  Yay! :)


There's still plenty to do, like find a headboard, refinish my $5 garage sale dresser, etc. which I'll be showing as I finish each project....you know, between fence installing, crafting "No Soliciting" signs, laying pavers and gardening, volunteering, attending college orientation (with BABIES!!), looking for a paying JOB, foster parenting classes, parenting my own child, summer vacation sleepovers, blah, blah, blah..... ;)


I have lots of fabulous garage sales finds to show you, like this huge basket I picked up for $7...that still sells at Target for $40!


But for now, I'll enjoy finally having my knock off artwork!  :)


I will be joining the following parties!


Tuesday, May 03, 2011

Latest Living Room Changes

I have been excitedly working on the living room!  :)

After I posted about the MANY problems with this try (sometimes it takes several tries and many tweaks to get the room you want).....


I started tweaking almost immediately.

I took everything down, patched the swiss cheese holes, and touched up the paint.

Then using only stuff I already had on hand, which means FREE people, I got to this, which I'm totally LOVING!!!


I know it looks very beige in this picture, but there really is color...plus I'll be adding more color as this room continues to evolve.  It's been so gloomy, rainy and gray here in Indy it's next to impossible to get really good pictures. :(

Anywho, here's a close up of the wall above the couch.


See?  There really is color! :)

What's really important to me is that some of the pieces incorporated here have alot of meaning and history to me.

The purple inlaid floral in the center, I purchased when I lived in Italy.  I purchased it during one of my many trips to Sorrento, Italy....my absolute, most favorite place in the entire world!!! 

The blue star candle holders were purchased in Germany.  My ex-husband purchased those on our last vacation the month before I transferred to Hawaii. 

The red shelf is my "independence shelf".  That was my first purchase after I left my husband (the first time, LOL).  It was something he would have never went for...so I bought it.  I have always loved that shelf but hadn't displayed it yet in this home...my first house.  Isn't that strange?  Maybe that's what's been missing all along. :)

Now, let me point out this area is not done. 

I need to create balance by adding something on the wall to the left of the shelf.  I'm working on that.  It won't necessarily be plates or even round, but we'll see what I find.

I still have to work out the lighting over the couch as these sconces are way to modern for this look. 

Plus, I need to paint or stain or a combo of both (which is what I'm leaning towards) the coffee table, add a rug, and I'd really like to replace my modern looking glass/wood Ikea nesting tables with something more worn and all wood (I hate glass tables!  They are impossible to clean!).  Although I'd still really like nesting tables, they are convenient in a small space. 

So, I'll be on the looking out for cheap nesting tables I can paint.


Some of the other elements I used on the shelf are Dollar Tree redo's (that I already had), like the bird, the little box the plant is sitting on, and even the finial which was a pale tan before I painted it will some ORB paint! :)

The little "Blessed" sign on the wall was a half priced Hob Lob item ($2.50) and the planter was a Marshall's find one day ($5.99), and who knows where the fake plant came from.


The plates were all picked up at various times (for cheap) and displayed in my house at random times.

And the mirror was a flea market score for $10!!!  

You've seen it in staged pictures before....it was white.  White was too crisp for my living room, so I took it out and gave it a couple coats of black spray paint and then distressed it a little.

Can I make a confession?  I hope you don't think I'm strange for this. 

Do you want to know how I remember how much I paid for all this stuff, even though some of it I've had for many years? 

I leave the price tags on the backs!!  On purpose!

Seriously!  I love a deal so much, that I leave the prices on the backs so everytime I move something I can relive how awesome of a deal I got!  Am I crazy?  Does anyone else do that??

Anywho.....out of nutty-land that is me and back to my living room. :)

Let me be the first to point out the pet bed in the room.  At any time there could be either cat or the big fat pug on the bed cushion.  Did you notice it?


Quite frustrating! 

It's a good thing they are all so darned cute! :)

Well, I think that's about it for now.  So, what do you think of the newest changes so far (it's not done)?  Is this a better stylistic flow?


Monday, April 18, 2011

Inexpensive Vignette and a Redo

I'm so behind all showing some of my living room transformations.

For those that have missed it, I am taking my home back to the cottage style I adore!  Plus I'm bucking the current trends and bringing back my favorite colors....reds, greens, browns and golds! :)

My no-sew curtains have been the perfect inspiration for my living room! 


They encompass everything I adore!! 

Flowers!! 

Frills!!

Red, green, brown AND gold!  Does it get any better! :)

So, of course, I've had to make other changes to get the warm, cozy  and inviting look I'm going for.  Those changes must come on a very tight budget!

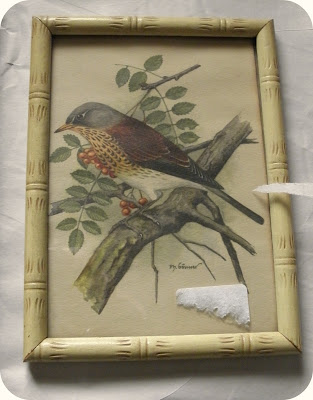
I found a new antique store not long ago that had some really great prices and alot of stuff right up my alley.  Like these vintage bird prints.


They were only $3 each....which I thought was pretty fantastic!

The larger one had some stains on the bottom left, but I knew immediately how I would hide those.  Plus the frames I was not loving.  They are plastic.  But worse yet...they LOOK like plastic.

As any blogger knows, the quickest and cheapest way to transform just about anything is with spray paint! :)

I took them apart and gave both frames a quick spray with Oil Rubbed Bronze spray paint and then lightly misted them with a goldish color spray paint.  The gold color was VERY light and just added dimension to the frames.

Excuse my horrendous carpet.  It's BAD!  I may have mentioned a few hundred couple times I REALLY want Bamboo floors.

It's amazing how spray paint took these pictures from cheesy to quite pretty if I don't say so myself!  I am totally loving these bird prints now. :)


I decided to keep the matte on the larger picture.  And my solution to cover the stains was to lean the smaller print in front of the larger one.


If you've been following me for a bit, you might remember my Pottery Barn steals back in February where I got this tray for $6.97 on clearance. 

I knew when I bought it that I wanted to lean it on a shelf as a back drop.  But at that time, even I couldn't have imagined how perfect it would be with my future bird prints! :)


I got the adorable little bird cage at Michael's recently for 50% off, which made it around $5.


I am a firm believer in plants in decor!!!!  Real or fake.  I can't say that enough!

Plants just add a warmth that you can't get any other way.  They fill dead space.  When in doubt....add a plant! :)


I got my little pot at the Christmas Tree Shop for $2 and believe it or not, I got the fake plant at the Dollar Tree.  I just took it out of the cheap pot it was in and stuck it in this one.  It's not that bad for a fakey.

So, my whole vignette came in at around $21.  I had all these items here already except the bird prints, but I went ahead and included the prices of everything since they weren't terribly old.

I think it looks like a million bucks. ;)


So....would have bought these cheesy plastic framed prints?  Or would have walked right past them?

There was a day not long ago, pre-blogging, I wouldn't have been able to see the potential.


Wednesday, March 30, 2011

Vintage Pins

First, I have super exciting news!

I got my acceptance letter on Friday to IUPUI (Indiana University Purdue University Indianapolis)!!!!


I will officially be a Interior Design student in the fall!!!!!!!!!!!!!!  WOW!!! 

That is a dream I've held onto my entire adult life!!  And it's finally going to be a reality!

Thank you to all of you that have sent me so many well wishes!  They really do mean the world to me. :)

******************

Ok....onto today's real post.

I could not wait to show you this project.  And you are not going to believe the price!!

Not too long ago, I found a vendor at my favorite antique mall (Southport Antique Mall here in Indianapolis), that has shelves full of plastic boxes, stuffed to the brim with what she calls "Bits and Baubles". 

Bits and Baubles are basically costume jewelry, alot of which are vintage pieces, some are broken, some are missing one jewel piece, some miscellaneous little pretties and small oddities...and then some gorgeous vintage costume jewelry completely in tact still.

I have fallen in love with all her vintage costume jewelry!!

And the best part, her prices!!  1 piece for $2 or 3 pieces for $5!!! 

I mean, heellloooo!!  Most vendors charge double that for one piece!!

Sure some of it is pretty cheesy stuff....but alot of it looks like this beauty!  You just have to take the time to pick through it all and find the jewels. :)


I pretty much find a spot to sit in the floor and just dig through each box looking for pieces like this.  I mean, at basically $1.50 a pin....how can I go wrong??

I had a bunch of these Dollar Tree frames leftover from my craft show during the holidays that I never did anything with. 


I took them apart and painted the wood frames, black for the larger, and white for the smaller one inside. 

I covered the mat with scrapbook paper that I got on sale at Hobby Lobby the other day for less than $.50 each.  The frame took less than half a sheet.  I heavily distressed the paper with black ink.

I bought a 1/4 yard of gorgeous black velvet at JoAnn's (with a coupon) for about $3.50). Velvet is e.x.p.e.n.s.i.v.e. people!!  But luckily I only needed a small amount, so I have plenty leftover for future projects.

I also used a small amount of quilt batting that I had to create a 'puffed' look under the velvet.  I just used the glass from the picture frame as my backing, and taped everything down.

Put it all back together and you get this!!!!


I am SOOOO flippin' tickled, I can't even describe it!  :)


I will absolutely be selling these at my upcoming craft show next month!!  And Miss 'Bits and Baubles' dealer has plenty more for me to pick through still. :)


At what is better?  Have you been doing the math with me?

This cost me less than $3.50 to make!!       


Visit my link at the top of the page to see what parties I like to attend. :)