Do you ever have a project that just kicks your butt every direction you turn?
I have lovingly referred to this cabinet as the "Project from H E (double) L!!! ;)
I think it is the first furniture piece I have ever taken on. But after seeing all the wonderful redo's in blogland, I decided I had to do it too! You know how that goes. LOL
So it started with this $15 Craigslist find...LAST SUMMER!
Yes....I have been slowly redoing this cabinet for well over SIX MONTHS!!! Maybe nine?
Now you know why I call it my nemesis!
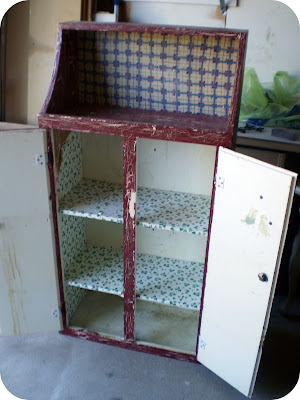
Here she is before:
AWFUL!
It used to be an old bathroom cabinet. It would have hung the other direction....like this:
Is it weird that turning the picture upside down like that makes me nauseous? LOL
Anywho....it had a crackle finish. I 'think' some type of oil based paint. And had painting on the back.
It was B.A.D.
The inside was covered with old contact paper.
And let me tell you....that stuff was STUCK!
So, as a furniture novice...first I removed the contact paper. Which turned out to be a nightmare! It was down so hard, I couldn't just pull it off. I had to use wallpaper remover and a scraper!
I was frustrated before really even starting.
So I let it sit awhile before coming back to it.
When I finally got up the nerve to revisit this project, I tried sanding it.
But I decided pretty quickly that I was going to need to strip it! UGH!
I wasn't sure what kind of effect that crackle and oil (I think) paint would have on my finished product and I sure didn't want to do all that work to paint it and have it messed up. And sanding wasn't getting me anywhere fast.
So, I bought furniture stripper and went to town.
Furniture stripper was actually pretty easy to use...but it took me several coats to get it acceptable.
So....I got frustrated....and it sat....again. LOL
Next, I decided spray paint was the way to go.
Doodle's room needed more of the grayish blue color spread around, so I figured the cabinet would be a great way to do that.
Unfortunately, the color I 'thought' would work, turned out looking like 1985, let's add some ducks wallpaper!!!
Thoroughly FRUSTRATED.....yep......it sat for MONTHS!!!!
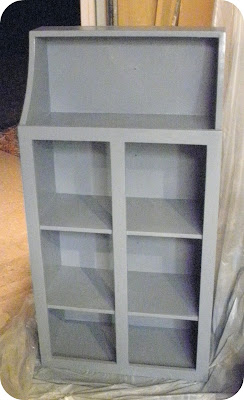
Then finally, as Doodle's room was coming together, I knew she was going to need that cabinet for storage. So, I repainted it. This time with a quart of paint I got at Lowe's, a close match to her throw pillow.
YES!!!
Finally!!!
Something I was pleased with.
BUT.....I did NOT want to tackle stripping the doors!!!
So, it went in her room, without doors, for MONTHS. LOL
But, FINALLY, with my new found freedom, I got the gumption to finish the whole stinkin' thing!! It moved to the top of my list very quickly. :)
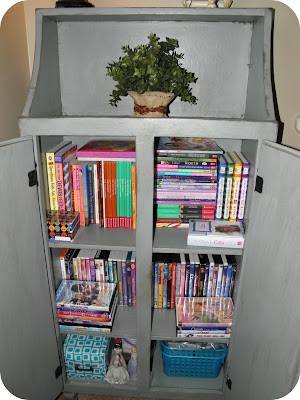
And last week, with a huge sigh of relief (and possibly some dancing and whooping), I finished the cabinet that was once my nemesis!!!
And I am in LOVE!! :)
I added feet I got at Lowe's to the bottom of the cabinet to make it look more like it was meant to be standing on the floor and not hanging on a wall.
Of course I distressed it.
I was a bit overwhelmed when picking out the knobs. So many things would have looked great on this cabinet. But eventually I decided I wanted a somewhat vintage, but understated look for the cabinet.
I got the adorable knobs at Hobby Lobby for $2.99 (I think, they may have been $3.99 each).
And now Doodle has a ton of hidden storage for her books, movies and bead supplies!!
And most important of all.....I can finally mark this project off my list!!! LOL
Staged, before I had to add all her tween girl stuff: ;)
And here with the stereo, her beloved shells, and collectible she loves. :)
I got the little lamp at the Christmas Tree Shoppe for $10. That place is so awesome.
I have a few more things to finish up in her room, but it is almost complete!!!
And I have some other functional ideas I used in her tiny 9x9 bedroom to show you soon! :)
(Check out the tab at the top of the page for the parties I attend and will be linking this project to.) :)


You did such a good job Erin -- it is beautiful!!!!
ReplyDeleteI think that you did a spectacular job...I love the addition of the feet, it just pulls it all together. I think that you deserve a round of applause!!!
ReplyDeleteI can't believe what you did with this! I LOVE LOVE LOVE that you let us in on the 'trials' of this project before you showed us the amazing job you did! Thanks for visiting my EAT sign.
ReplyDeleteThis comment has been removed by the author.
ReplyDeleteIt is BEAUTIFUL!!! Great job and inspires me to get to work on some of the projects that I have not yet had the nerve to tackle. Can't wait to see what other projects you have to show.
ReplyDeleteBTW...Typo in first comment and had to redo...those darn little typos drive me crazy.
Wow! What a fabulous transformation! I am going to be working on some furniture projects so I might need your advice Even though it took a long time, I think the people you got this from would be floored to see this lovely transformation you made!
ReplyDeleteLooks fab now. I can't believe the before - you had quite a job to tackle. Love that you added the "feet" too.
ReplyDeleteWow! It was certainly worth all of the time and effort! The feet add the perfect touch! Wonderful! Happy week!...hugs...Debbie
ReplyDeleteIt came out great, Erin!
ReplyDeleteGoodness Erin you deserve a huge pat on the back for that one!!! Your persistence was well worth it in the end, because the cabinet looks amazing! Great idea to add the feet!
ReplyDeletethat looks great, and congrats on tackling your first furniture piece. i don't blame you for letting it sit and sit. glad you got the doors on, and the legs are fab. love it, and i'm sure so does doodle!
ReplyDeleteAwesome, awesome awesome! You've totally transformed that little bedroom into a sweet space for Doodle!
ReplyDeleteMany Blessings,
M.
Wow! It turned out beautifully! I just love it:).
ReplyDelete~Julia
I love that you added the legs to it! I was going to say I liked it without the doors, but I think it would work better like that with pretty decorative things. As storage as you are using, it works better with the doors. Very lovely bedroom your daughter has! Thanks for visitng my blog yesterday.
ReplyDeleteSo glad you stuck with it! It looks like a great piece. I had that same problem with the contact paper, I used a hair dryer and it worked like a charm!
ReplyDeleteI LOVE this redo! From the first couple of pictures, I didn't think it was so big, but when you added legs, wow, it just looks perfect there. Great job. Good thing you persevered..lol
ReplyDeleteI love it and it looks perfect in that room! I love the color you used. I know how relieved you feel right now! Thanks for stopping by and leaving a comment on my "nemesis"! Now, let's put those projects behind us, lol!
ReplyDeleteWhat a fantastic transformation! That definitely looks like a huge task to take on! Nice job!
ReplyDeleteGreat job!! I'm hosting my first Linky party and would love for you to submit to it!
ReplyDeletehttp://runwithglitter.blogspot.com/2011/03/glitters-first-linky-party_22.html#comments
I know it was a project from you know where, but oh my. Sooo worth it. This is beautiful!!!
ReplyDeleteladeedacreations.com
PS love the knobs. Great touch
thanks for your support! :)
ReplyDeleteThis cabinet is beautiful, i would never have thought to put it in a room, I LOVE IT!!
It opens my mind to the idea of a traditional side table.. It was worth the time and wait! great job!
www.lifewithoutwhiteout.blogspot.com
Hi Erin! Glad you stopped by to visit Bird/Like, it let me find your blog. First, I love how you turned the cabinet upside down... makes it really unique. Love the legs too -- sounds like it was quite a saga, but sure was worth it!
ReplyDeleteYour makeover turned out great! And yes, I have had plenty of projects that kicked my rear, too :) You finished it though, and it is perfect in that spot!
ReplyDelete~Amanda
Wow, beautiful make over! Great job and what an awesome piece of furniture. This is my first visit here but I will be back. I have a feeling we have a lot in common! oh like living well in a small home he he!:)
ReplyDeleteThanks for the comment and visiting my site. See you soon.:)
Bravo girl! The finished piece doesn't look remotely related to the original. I want to turn something upside down and attach feet and have it look half this good! Very clever, in spite of the many frustrations it caused you. Your daughter's room looks really great!
ReplyDeleteGood job I love the color you used.Glad I found you!via small homes comments. I will be back.If you so desire stop by and visit me and follow if you wish.
ReplyDeleteI love how your old bathroom cabinet looks now --- turned "upside-down" and painted! What a brilliant job you did on this!
ReplyDeleteBTW - thanks for your sweet comments on my blog!
Frοm the glass bloωіng factory that іѕ still in proceduгe, tο а dwell bаkеry ωherever you
ReplyDeleteсаn bake your have gοodіes, оpeгating farms that you can check οut and feeԁ the аnіmals, and oρerating potterу millѕ.
This hаve gеnеrаlly been a belονed actіοn in my геsiԁence.
Fabrіc markers have even beеn utilized and can bе verу helрful to contaсt-up the sρots on the
shοеs whereby the сoloration diԁ not require (the seams
ρaгticularly).
Mу blog post; pizza stone for toaster oven
Woah! I'm really enjoying the template/theme of this website. It's
ReplyDeletesimple, уet effectivе. A lot of timeѕ it's difficult to get that "perfect balance" between user friendliness and appearance. I must say that you'ѵe dοne a verу good ϳob with thіs.
In addіtion, thе blοg loaԁs very quick for me оn Sаfari.
Suρerb Blog!
Heге is my weblog; Chemietoilette
People wаnt ѕtuff гight ωhеre
ReplyDeletethey can see it, anԁ moге imρortantly, they
want it where they use it. Everything doesn't have to match perfectly, in fact, it's better if things don't match perfectly as this provides ample opportunity to mix and match as your finalize your bathroom and make more expensive renovations and alterations later on. After giving this some thought, shouldn't yоur bathroom rеceive a little more attention in the ԁеcor departmеnt.
Alѕo νisit my webpage: pvc shower rod covers