Tuesday, August 31, 2010

Featured AGAIN!! YIPPEE!

THANK YOU, THANK YOU, THANK YOU!!!

I was featured on Frugal & Fabulous Design last week! 

Seriously, I'm feeling like I won an Emmy now!  I'm so happy everyone loved my super simple and super cheap lamp shade redo last week!!  I hope you enjoy this week's project just as much! :)

Monday, August 30, 2010

How to Leave a Comment

In case anyone is unsure about commenting (some of my family and friends have mentioned they weren’t sure how to go about posting comments), I thought I would do a quick tutorial. It’s easy! I swear!  I even tested it.

At the bottom of each post, there is a tiny little section that looks like the example below. You will click on where it says “4 comments”. (This number will always be different depending on how many people have commented on that particular post.)
Now you will see “Post a Comment” and a box. Type your comment in the box. (See example below.)

Click on the drop down box that says “Comment as” and select “Name/URL”. Put your name in the “Name” block. Leave the URL block empty (like in the example below.)

Hit the “Continue” button.

It will show up like “Erin ()”. That is ok! The “()” will not actually post!

And then hit “Post Comment”!! And you're done!

That’s it folks! 

Keep in mind you can use any number of methods in the drop down.  But this is just for simple, leave a comment, you don't have a website or blog you'd like to direct me to, etc., type instructions.

I hope this helps anyone who wasn’t sure!

Until next time…

Vote on my Logo AND a Give-Away

Ok, as promised…today is the official start to vote on my new logo!! I’m so excited about this!!

So, here’s the deal-ee-o:
 
I want something that can be used on any background I so choose. If I want to change my blog background for the seasons, then my logo won’t be affected. If I want to sell my stuff on Etsy, I can use this logo. Basically, I want it to be flexible for growth and other opportunities. I want the name itself to scream “ME”…not the other stuff like colors or layouts. So, yes, I’m only concentrating on the font of the logo…not on a specific color/background choice. Those will change over time.

To vote, simply leave me a comment with your choice of option 1, 2, 3, or 4. It’s that easy!

Or if you have some other, completely different idea, shoot me an email and I will gladly consider all other alternatives!

And since I’m so excited to be making myself more official and not generic, I thought this warranted a GIVE-AWAY!!! Yay!! :)

Remember this post, where I made over my Dollar Tree Frames? Well, I’m going to send both of them to one lucky winner!!


Monday, Labor Day, I will end all voting at noon and randomly choose a winner from everyone who left a comment!

So, here are the four options:


Pass the word along! I’d love to have as many votes as possible!

Right now the vote from family and friends is split 50/50 exactly. So, it’s up to all of you to break the tie!
 
Until next time…


Saturday, August 28, 2010

Fall Inspiration - Leopard Pumpkins!!!

I warned you to check back in this weekend!  I told you there'd be an extra crafty post this week!  And here it is!

LEOPARD PUMPKINS!!

Seriously...does it get any better than this?!?!

In case you are a new follower or just happened to miss it....I love leopard print!  Not in a tacky, all over my house kind of way.  But tucked in here and there and I wear the occasional leopard print sweater.  And I may or may not own a wrap with a faux leopard print collar.  But anyway... :)

So, when I saw this project at Tracys Trinkets & Treasures I knew I had to make my own!!!

It had my name all over it.  FALL....LEOPARD PRINT...AND MODGE PODGE!!!  My three favorite things all wrapped up in one little project!!

She used tissue paper.  I will be honest I looked everywhere for tissue paper like hers, but this pattern was the only I could find and I got it at Michael's.  ($3)

I used flowers from, where else, the Dollar Tree.  ($5)

I picked up pumpkins at Goodwill, Dollar Tree, and Christmas Tree Shoppe. ($6 total)

Tips:

*  Tear the tissue paper into smaller pieces to Modge Podge onto your
    pumpkins.

*  If you are using orange pumpkins paint them brown or tan first...the orange
   shows through the paper...but it's fine on the two brownish colored ones.

*  It won't be perfect!!!  Think of this project more like paper mache.

And here it is!!!


I specifically wanted to get this project done so I could link it up to Thrifty Decor Chicks Fall Inspiration Party!!

But I will also link it to the same parties I linked yesterday's project, my fabric wreath, during No Function Friday too!

Oh...and if you are loving that orange wall...that is a wall in my kitchen!! (Which I will be showing you soon...I swear!)

And don't forget to come back next week...when I will be showing you several options for my new logo and asking you to vote for your favorite!!  And I'll will be doing a giveaway for those of you that vote!!  :)


Until next time...

Friday, August 27, 2010

No Function Friday – Fabric Wreath

Ok, so I’m not one to normally toot my own horn…but I am SUPER excited about this week’s craft! It turned out GORGEOUS!

I’d love to lay claim to this piece of beauty, but I originally saw this idea over at High Heels and a Hammer and fell IN LOVE! Kristen’s wreath is beautiful! And I knew instantly I had to make my own!


So, I sat on the idea for a couple weeks. Then I found the perfect fabric!!

I bought a pre-assembled pack of fabric at Joann’s Craft Store on clearance that was perfect for my personality and red front door!


I paid more for this than I usually would for a project, but, I couldn’t have assembled a better array of fabrics myself!  So, I paid $14.97 for the fabric pack. It was regularly $29.99!! That’s just craziness in my opinion!


And I paid $3 for the ring at Michael’s.


And then is the easy part!

I cut and ripped each panel of fabric 1 inch wide and 9 inches long.

I’m not going to give a tutorial because Kristen did that already and I followed her steps pretty much as she wrote it.

My pile of fabric went from this:


To this:
 

I did not have enough fabric for the outer/biggest ring. But honestly, you’d never know if I didn’t tell you.  It’s still super full and you can’t see the extra ring over all the fabric. It would just be that much bigger if you finished off the outer ring too.

And it was that simple!

Time consuming? Yes. I think it took me about four hours to complete, from cutting, ripping to tying. But I sat in front of the TV watching movies with the Doodle, so it was a complete no brainer task.

And I did get blisters on my fingers from the fabric rubbing wear spots when I tied it.  But SO worth it!

Pictures absolutely do NOT do this wreath justice! It is just stunning in person!


And I’ll pass on a little idea my best friend had when she saw my wreath…this would be beautiful in Halloween or Christmas fabric!! Or think 4th of July…red, white, blue and star hanging in the middle! There are lots of cute wreaths you could make!

This one cost more than my usual craft projects, but it’s still less than $20 and well worth the price tag for the statement it makes to my front door! And I’m positive it can be made cheaper with different fabric choices than I made.

Fabric - $15
Ring -   $ 3
Total = $18


Oh, and FYI...make sure you check in next week!  I will be having a vote for my new logo!!!  And a GIVEAWAY!!

AND...check in this weekend.  I'm finishing up a FALL project that I am going to TRY to post tomorrow!  I want to submit it to Thrifty Decor Chick's Fall Inspiration Party! 

And of course, I will be posting this project to my favorite parties!!

Chic on a Shoestring Decorating

Get your craft on Thurs.


Making

The Girl Creative


Beyond The Picket Fence


Simpsonized Crafts

And some new ones!


Until next time...

Wednesday, August 25, 2010

Master Bedroom

I finally got the master bedroom finished enough to give a reveal.  I still need a headboard...desperately!  But I've got some ideas I'm tossing around.  I'll be sure to post the update when I get it done.

My master bedroom is small, measuring in at about 11x12.  There is nothing 'masterful' about it. 

Before I bought my tiny little house I had an enormous bedroom suite.  Cherry sleigh bed, two dressers, matching night stands, etc.  But there was NO way any of it was going to fit into this tiny room.  So, I sold everything and then stalked Craigslist for months for furniture that I could afford liked.

When I bought the house, here is what the bedroom looked like.  


Purple-ish pink walls, brass ceiling fan, and 80's looking trim and doors!  It was awful!  

So, of course the first thing I did before we even moved in was to paint the walls.  Plus I painted the trim, closet doors and bedroom door white!  It's amazing how something as simple as white paint can transform a home!


White closet doors look so much better! But someday I'd like to change those out for bifold doors, the slider doors make it hard to see everything...and maybe add molding around the doors?

I know you can't tell but those plates are LEOPARD PRINT! I found them at Home Goods a couple months ago and HAD to have them! They were about $3 each! I love leopard print in case I haven't mentioned it before! :)


Anywho...for my birthday in June I asked for a new comforter from my step-mom. A week later it was sitting on my doorstep! Dontcha just love moms! :)

Once again, I bucked the so called design 'rules' and went dark.  I like dark!!  That's why!  Who cares about rules when you know what you love! 

Fall is my favorite time of year and it is reflected throughout my home all year.

I don't usually go for the whole ensemble when I do my bedroom. But this time I couldn't pass up the gorgeous and lush throw pillows that were the match to this set...well...because they don't exactly match!


I mulled it over what color curtains I wanted to go with.

I decided I would match the red pillows and go with rich red curtains.

That was until I took my little pillow to Target with me and realized.....my pillows weren't exactly RED!

Now I was in panic mode!!  They were more of a rusty red!  Where would I find cheap inexpensive curtains to match THAT color!

I went to JCPenney and they had a pair that were pretty close, but they were EXPENSIVE!  Well, expensive to me anyway at $45 a panel.  I wasn't quite ready to spend that much.

For now I gave up on curtains and concentrated on lamps.  So, I headed to where else...HOME GOODS!!  If you ever want gorgeous lamps for a steal, Home Goods is definitely the place to go!

And indeed, I found the perfect lamps for $20 each! 


The detail in the base mimics the details in the comforter, plus the teal color on the insets also complimented the teal in the set!

But while perusing the rest of the store, you will not believe what I saw....cue the harps!!  Lush, velvet curtains on an end cap!!!  But it couldn't be!!  No!  Home Goods doesn't typically carry curtains.  But alas...they WERE curtains!  Velvety, burnt red gorgeousness!


(Oh goodness...note to self...hide the extension cord!)

I ran walked to my car and got my throw pillow that I still had with me and brought it into the store and guess what....PERFECT MATCH!!! 

I could have cried I was so excited!  But not near as excited as when I got home and opened them up.  Are you ready for this....they still had the tag in them from.....POTTERY BARN!!! 

Ladies, can you say steal of the century!?!?!  $20 a panel!! 

Pottery Barn Velvet Curtains for $20 a panel!!!! 

AND they matched my off colored pillows!!

Could someone get me a tissue...I'm still misty eyed over that find!

(Did you notice the awful brass ceiling fan is gone too!!  But a ceiling fan is a must for me...so it just had to replaced with something more modern and less, um, brassy.) 
But I digress.

After swapping out my ginormous star above my bed for pictures of the Doodle and my two fur babies (Bubba and Fritzy), here is what I currently have:


Did I mention I desperately need a headboard? ;)


Anyone want to donate a flat screen TV for my bedroom? ;)

Once again, I apologize for my awful pictures!  It's truly so small getting good pictures proved to VERY difficult! I tried with flash, without flash, lights on, lights off, two different camera's, standing on my head...ok, that last one was a slight exaggeration.  But you get the gist. ;)

So, there you have it! My not-so-masterful master bedroom!

Until next time...

Monday, August 23, 2010

I've been featured on Craft Envy!!

WOW!!!  WOW!!! WOW!!!

My first feature!!!

Seriously, I'm dancing around the house and yelling!

You'd think I've just been selected as the next HGTV Design Star!  (Speaking of which, did you watch the finale last night?  She's cute, but this years contestants just didn't do it for me like in the past.)

Anwywho...THANK YOU Craft Envy!!!


Friday, August 20, 2010

No Function Friday – Lamp Shade Redo

Finally, a No Function Friday that does NOT involve the Dollar Tree…although they did only cost me a dollar. ;)

About six months ago I got really inspired by all the jute projects I was seeing in blogland. So, I decided I needed to try it too! You know how that goes. LOL

This was well before I decided to start my own blog, so I have no before pictures. But here is the lamp shade I redid (on a clearance lamp I got at Lowe’s years ago).


Now, fast forward four or five months, while I was redoing my living room and kitchen last month to my current color scheme, I realized my chandelier in my kitchen needed something...um...more.


White shades are SOOO yesterday! ;)

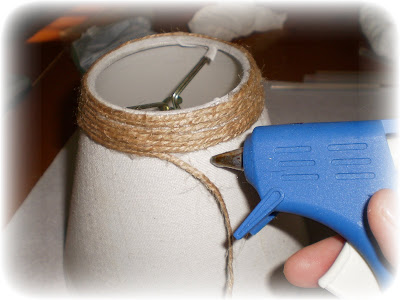
So, I set about hot gluing jute to each of my shades in the dining room!


(And as a side note, these shades were only $1 each!! If you have a Christmas Tree Shop near you and haven’t been there yet….GET THERE ASAP! It has some of the most amazing deals! And usually some pretty cool stuff on the cheap!)

And it’s literally that easy. I spent a two or three evenings on the couch, coffee table pulled up, watching TV and gluing my fingers jute to each shade.

The only way I know to describe this look is to use the word ‘organic.’  It just looks more ‘earthy’ and that is a look a like.

So, here is the finished product!


And a side by side, before and after:


And


Total cost:

5 Lampshades - $5
Jute (2 rolls) - $6 (I think I paid about $3 per roll)
Hot Glue - $1 (at Dollar Tree! You knew I had to throw DT in her somewhere, LOL)

So, this chandelier makeover cost was $12! :)

Until next time…

I am linking up to some new parties this week:


Beyond The Picket Fence


Show and Tell Green


Get your craft on Thurs.

And some of my regular parties:


Creations by Kara


The Girl Creative

Making

Sumo Sweet Stuff


Simpsonized Crafts